Blood Orange Upside-Down Cake GF/DF/EF

Every Sunday evening, while my grandparents were alive, my family would visit them.  My Grandma L would often have a candy dish to raid, or a homemade dessert to eat if we were lucky.  One thing that she would make quite often was a lemon cake.  It’s been a while since I’ve had it, but I remember it was soooo good.  Come to find that all that the cake was, was a yellow cake box mix with lemon jello poured over top after it was baked.  No idea.  

That kind of reminds me of how my sister found out that my Grandma B would use Stovetop brand stuffing for her thanksgiving stuffing (with a few extra ingredients so she could call it her own).  I guess there is a lot of truth to the concept of tasting the love in something because it obviously overpowered the processed taste I believe I would recognize.

I have gone through my grandmothers’ recipes and have tried to come up with ways to make the dishes allergen-friendly.  Some recipes are impossible (can’t exactly make an egg-free angel food cake), some are just not worth the bother, and some I’ve actually had success with.  The lemon cake kind of fell into the first category and a little bit of the second.  

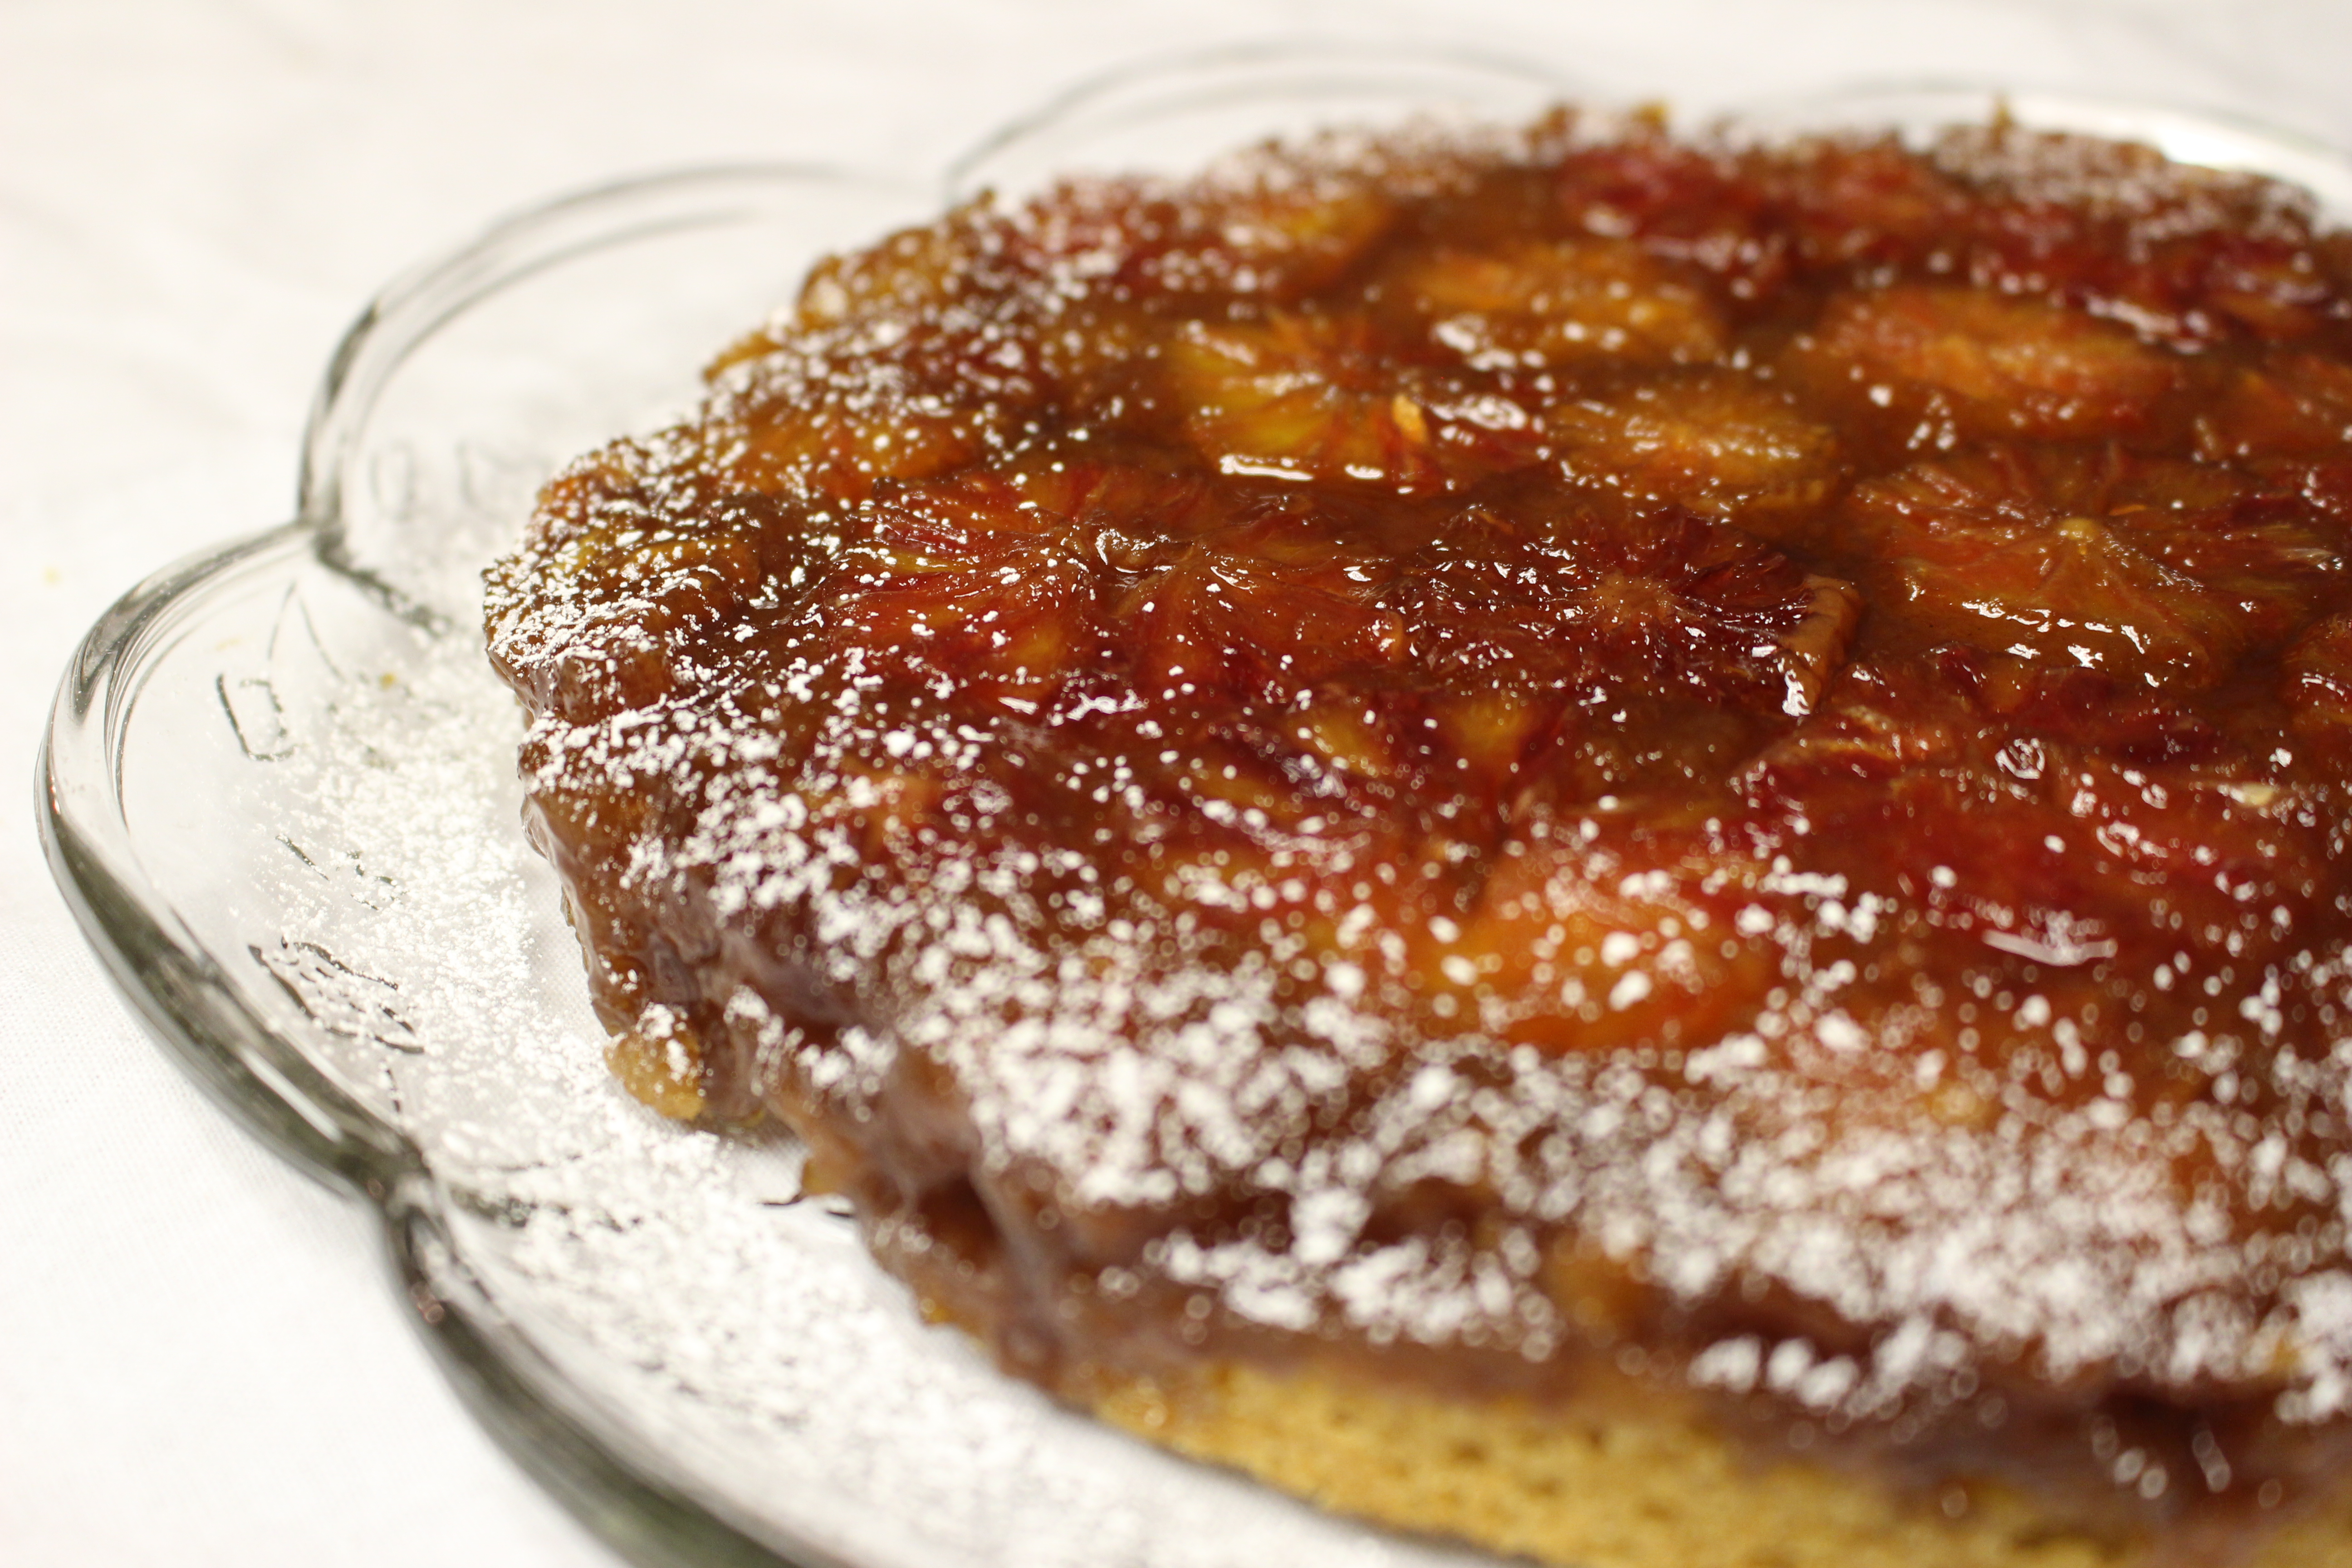
A couple of months ago, okay, probably a year ago, I saw this recipe for a citrus upside down cake.  It looked so beautiful, I had to try it.  Fast forward a year later, and while at the store yesterday I noticed that the blood oranges were on sale.  I remembered that recipe, and impulsively bought a half dozen blood oranges.  Thankfully I ended up having all of the other ingredients needed to modify the original recipe into one that was more allergen-friendly.  

Gluten-Free Blood Orange Upside-Down Cake

The result of this recipe was amazing, and, as you can see by the pic, beautiful.  That first taste definitely took me back to having my Grandma L’s lemon cake, but thankfully, no artificial lemons were harmed in the making of this cake.   

Blood Orange Upside-Down Cake
Write a review
Print
Topping
  1. 3 tablespoons coconut oil
  2. 1/2 teaspoon cardamom
  3. 6 medium blood oranges
  4. 2/3 cup packed light brown sugar
  5. 2 tablespoons fresh blood orange juice
Cake
  1. 3 tablespoon brown rice flour
  2. 1/2 cup sorghum flour
  3. 1/4 cup potato starch
  4. 2 tablespoon tapioca starch
  5. 3/4 teaspoon xanthum gum
  6. 1 teaspoon baking powder
  7. 1/2 teaspoon sea salt
  8. 3/4 cup granulated sugar
  9. 1/4 cup packed light brown sugar
  10. 1/2 cup applesauce, mixed with 1 teaspoon baking powder
  11. 6 tablespoons coconut oil, melted and cooled slightly
  12. Zest of one blood orange
  13. 1/2 cup So Delicious cultured coconut, plain (coconut yogurt)
  14. 1 teaspoon vanilla extract
Topping
  1. Grease bottom and sides of 9-inch round, 2-inch-deep nonstick cake pan; set aside. Adjust oven rack to lowest position and heat oven to 350 degrees.
  2. In a small saucepan, add coconut oil, brown sugar, and juice, stirring until sugar dissolves. Stir in cardamom and transfer mixture to prepared pan. Zest one of the oranges if you haven't already, slice the ends of the oranges and place flat end on cutting board. Slice away the rind and pith from the top to the bottom, following the curve of the fruit. Slice into 1/4" wheels, be sure to remove any seeds (blood oranges have just a few, but nobody wants to chomp down on one of those). Lightly set the orange slices in a single, tight layer over the mixture, doing your best to cover the bottom. Set aside while preparing cake.
Cake
  1. Whisk brown rice flour, sorghum flour, potato starch, tapioca starch, cardamom, xanthum gum, baking powder, and salt together in medium bowl; set aside. Whisk granulated sugar, brown sugar, and and applesauce mixture together in large bowl until smooth, about 45 seconds. Slowly whisk in coconut oil until combined. Add cultured coconut, zest, and vanilla; whisk until combined. Add flour mixture and whisk until just combined. Pour batter into pan and gently spread evenly over the oranges. Bake until cake is golden brown and toothpick inserted into center comes out clean, 35 to 40 minutes.
  2. Cool pan on wire rack for 10 minutes. Run paring knife around sides of cake to loosen. Place wire rack over cake pan. Holding both pan and rack tightly, invert cake pan and wire rack together; lift off cake pan. Place wire rack over baking sheet or large plate to catch any drips. If any fruit sticks to pan bottom, remove and position it back on top of cake (no one will ever know). Let cake cool 20 minutes (or longer to cool it completely), then transfer to serving platter, cut into pieces, and serve.
Notes
  1. No need to waste an orange to get the 2 tablespoons of juice needed for the topping, I find that I can easily get the amount of juice I need from squeezing the sections of peel I cut off of the oranges. What can I say, I don't like being wasteful.
One Fine Tomato http://onefinetomato.com/
Something funny, I made this in the evening and wanted to wait until the next day to take pictures so I could have natural light.  Once you make this, however, you will understand that it was IMPOSSIBLE to wait.

Gluten-Free Blood Orange Upside-Down Cake


‘Sour Cream’ Rolls GF/DF/EF

 Let me start off with saying these biscuits are so gooddeliciousdelectable, A-MAZ-ING.  Since I have gone gluten-free, egg-free, and dairy-free, I have some bread and dinner roll recipes I have been using to fill that humongous ‘bread gap’.  They have, for the most part, been a decent substitute, but these Sour Cream Rolls are bar-none the best rolls/biscuits I have ever had.  Seriously, in all humility, these are the best ever.  I did not miss the gluten AT ALL.  They have a nice crust on the outside, with the fluffy interior that seems to always be lacking in all of the gluten-free rolls I have tried.  

Okay, before I begin waxing poetic on these, here is the recipe.

'Sour Cream' Rolls
Yields 12
Write a review
Print
Ingredients
  1. 1 teaspoon kosher salt, plus extra for sprinkling
  2. 3/4 cup sorghum flour
  3. 1/4 cup teff flour
  4. 1/2 cup tapioca starch
  5. 1/2 cup potato starch
  6. 1 tablespoon baking powder
  7. 1/2 teaspoon baking soda
  8. 1-1/4 teaspoon xanthum gum
  9. 16 oz dairy-free yogurt (I recommend So Delicious Cultured Coconut, Plain)
  10. 7 tablespoons of coconut oil, divided
Instructions
  1. Preheat oven to 425˚ and line a rimmed baking sheet with parchment paper. Combine all ingredients other than cultured coconut and coconut oil in a large bowl. Stir in cultured coconut and 5 tablespoons of coconut oil and mix until combined.
  2. Using a quarter cup, scoop out dough and place on parchment paper 2 inches apart. Brush will remaining 2 tablespoons of coconut oil and sprinkle with kosher salt. Bake for 20-25 minutes, until golden brown. Let them cool on cookie sheet for 15 minutes. Best when served warm.
One Fine Tomato http://onefinetomato.com/
 Since I found out that gluten, dairy, and eggs, would make me sick, for Thanksgiving dinner I would make sweet potato biscuits to replace my Grandma L’s fluffy, buttery delicious rolls (those I could definitely wax poetic on).  While the sweet potato biscuits were delicious, it still left me feeling like I was completely deprived and missing out (especially since the sweet potato biscuits couldn’t be used for the leftover sandwiches after thanksgiving as they were too crumbly).  

After creating this recipe, however, I no longer feel completely deprived.  There will always be a part of me that yearns for my Grandma’s rolls on Thanksgiving, but this recipe is the closest I have ever come to competing with the fluffy interior of those rolls (plus they can be used for leftover sandwiches).  

Hermits, GF/DF/EF

You may think by the post title ‘Hermits,’ that I’m talking about myself.  While I was a bit of a cyber-hermit, I certainly haven’t been hermitting (yes, I just made up a word) otherwise.  

I have a large family of 28 members and they were all in town for a week.   With our family, there are certain cookies and candy that if they weren’t on the dessert table, there would be an uproar, and Christmas would be ruined.  Okay, maybe there is a little exaggeration there…not really.  Because there are quite a few others in my family that have food allergies, this meant I had to make batches of both ‘normal’ and allergen-free cookies and candy.  

So I have been pretty busy baking both before and after work for quite some time. I will be slowly posting recipes for some of those treats.

Now back to the recipe for the hermit cookie.  I came across these while going through my grandma’s recipes.  Unfortunately, the recipes came with no directions to it (my guess is it was one she copied quickly out of a magazine).   

I did a search for hermit cookies, and found one that was similar to my Grandma’s, and I successfully converted it to be vegan, and gluten-free.  While a humble looking and sounding cookie, they are delicious, travel well, and stay moist.

Hermits
Serves 40
Write a review
Print
Ingredients
  1. 1 cup raisins
  2. 2 tablespoons finely chopped crystallized ginger
  3. 8 tablespoons coconut oil
  4. 1 teaspoon ground cinnamon
  5. 1/4 teaspoon ground allspice
  6. 1/4 cup brown rice flour
  7. 1/2 cup sorghum flour
  8. 1/4 cup teff flour
  9. 1/2 cup tapioca starch
  10. 1/2 cup potato starch
  11. 1 teaspoon xanthum gum
  12. 1/2 teaspoon baking soda
  13. 1/2 teaspoon salt
  14. 3/4 cup packed brown sugar
  15. 1/2 cup molasses
  16. 1/2 cup applesauce mixed with 1 teaspoon baking powder
  17. 1/2 teaspoon orange zest
  18. 1-1/2 tablespoons orange juice
  19. 3/4 cup powdered sugar
Instructions
  1. Preheat oven to 350 degrees and adjust oven racks to upper middle and lower middle positions. Line two baking sheets with parchment paper.
  2. In a food processor, pulse raisins and ginger until the mixture sticks together and only tiny pieces remain. Transfer to a large bowl. In a separate bowl, mix together flours, starches, baking soda, and salt.
  3. In a small pan, melt coconut oil with cinnamon, and allspice and cook until fragrant, a few minutes. Stir into raisin mixture. Add brown sugar, molasses, and applesauce mixture. Stir until combined. Stir in dry ingredients and refrigerate for 2-24 hours, until dough has firmed up.
  4. Divide dough into 4 even pieces. Place two pieces on each lined sheet pan. Using a rolling pin or just your fingers, press/roll each portion of dough into an even 10 inch log (if dough is too sticky, sprinkle dough with rice flour), use a ruler to square the edges.
  5. Bake in preheated oven for 15-20 minutes, rotating pans halfway through baking. Only a shallow indentation remains on edges when touched, but the center will appear slightly soft. Let cool for 5 minutes before transferring parchment to a wire rack to cool completely.
  6. In a small bowl, whisk powered sugar and orange juice together to form a glaze. Drizzle over cooled logs, and let sit until glaze is hardened. Slice into 1 inch portions.
Notes
  1. When stored in a container, these cookies remain moist and delicious for a long time.
Adapted from Cooks Country
One Fine Tomato http://onefinetomato.com/
 I have no idea where the name came from.  Maybe because they aren’t glamorous looking like a hermit likely is, or maybe it’s because these are so delicious that you will want to become a hermit and keep all of the cookies for yourself.